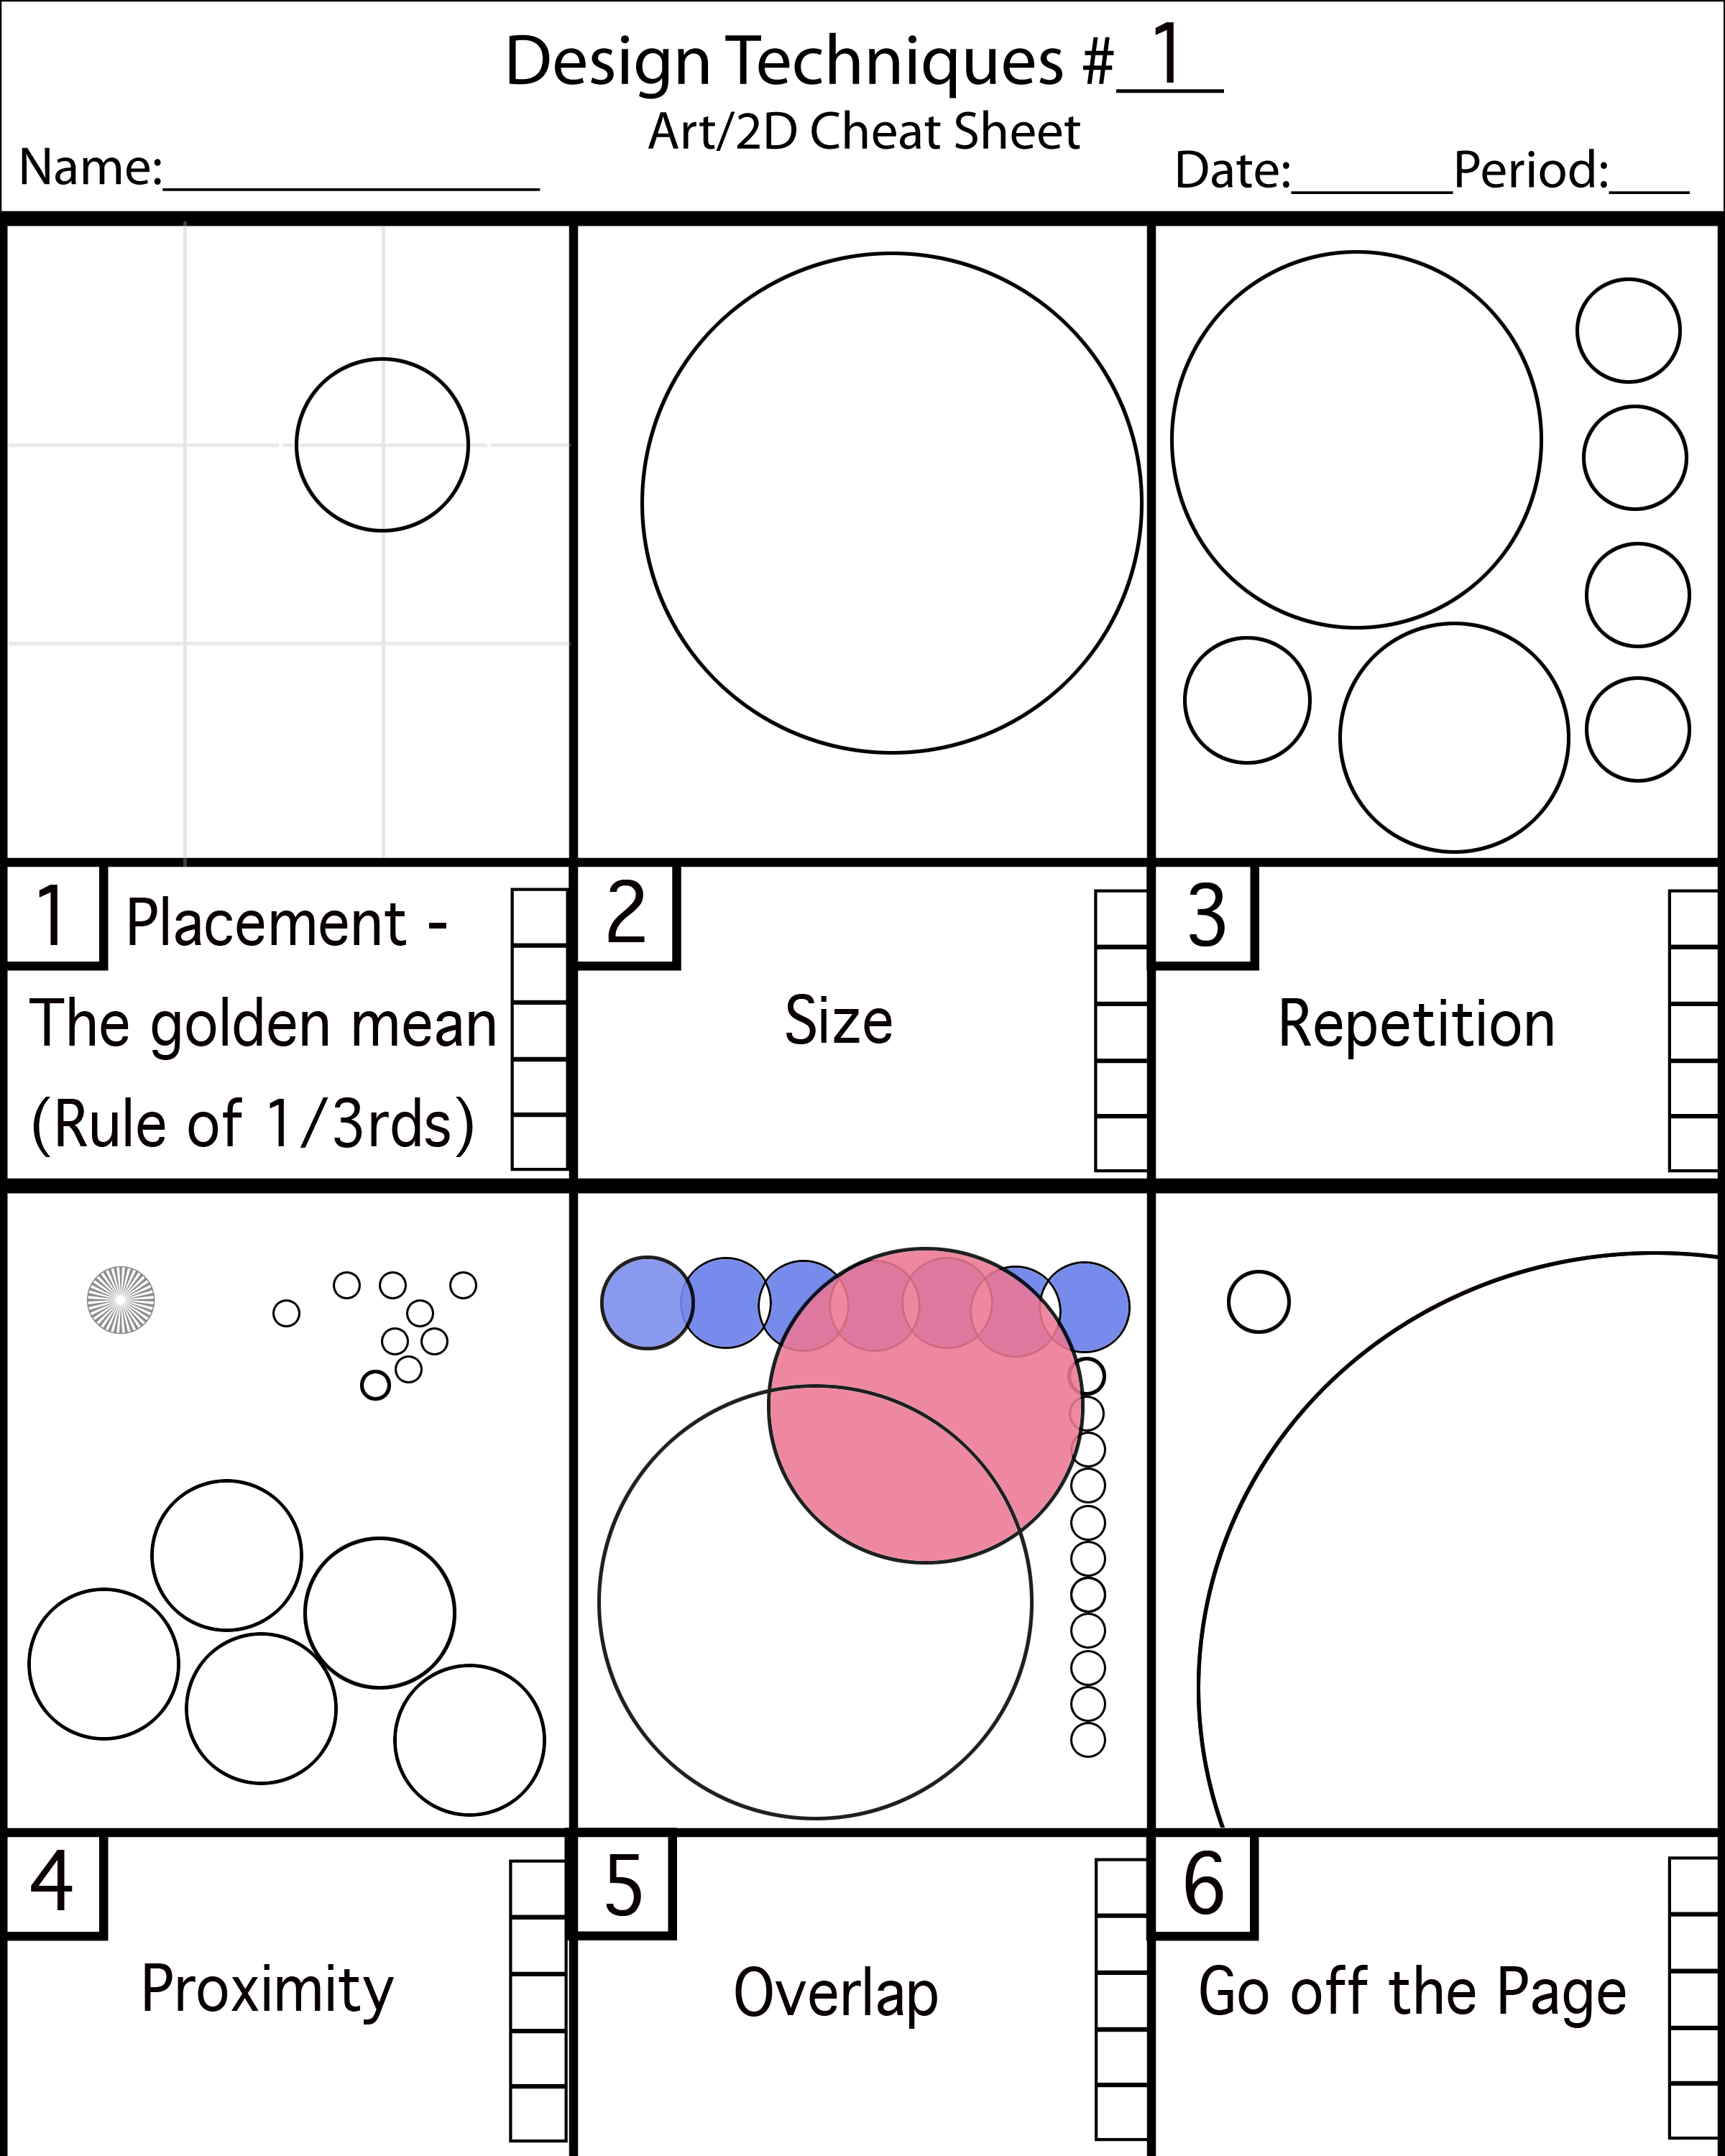
Motif overlapping (Opaque/transparent) and color placement.
4 Practice compositions on printing paper cropped 1 1/2 inches from the top of the page.
Create 4 designm organizations using a rectangle to stand for your motif.
Think about how you place your motif in relationship to the other motifs.
Think about overlapping opaque and transparent shapes.
Begin your final design in pencil.
Organize shapes in the work in terms of warm and cool colors creating a strong center of interest. You should thnk about contrast of warm and cool and amount of warm and cool colors.
No School Today -Veterans' Day
Nov. 14
Nov. 15
Nov. 16
Nov. 17
Nov. 18
Start up
Name Design
Motif overlapping (Opaque/transparent) and color placement.
4 Practice compositions on printing paper cropped 1 1/2 inches from the top of the page.
Create 4 designm organizations using a rectangle to stand for your motif.
Think about how you place your motif in relationship to the other motifs.
Think about overlapping opaque and transparent shapes.
Begin your final design in pencil.
Organize shapes in the work in terms of warm and cool colors creating a strong center of interest. You should thnk about contrast of warm and cool and amount of warm and cool colors.
Start up
Name Design
Motif overlapping (Opaque/transparent) and color placement.
4 Practice compositions on printing paper cropped 1 1/2 inches from the top of the page.
Create 4 designm organizations using a rectangle to stand for your motif.
Think about how you place your motif in relationship to the other motifs.
Think about overlapping opaque and transparent shapes.
Begin your final design in pencil.
Organize shapes in the work in terms of warm and cool colors creating a strong center of interest. You should thnk about contrast of warm and cool and amount of warm and cool colors.
Start up
Name Design
Organize shapes in the work in terms of warm and cool colors creating a strong center of interest. You should thnk about contrast of warm and cool and amount of warm and cool colors.
Nov. 21
Nov. 22
Nov. 23
Nov. 24
Nov. 25
THANKSGIVING BREAK
THANKSGIVING BREAK
THANKSGIVING BREAK
THANKSGIVING BREAK
THANKSGIVING BREAK
Nov. 28
Nov. 29
Nov. 30
Dec. 1
Dec. 2
Start up
Name Design
Motif overlapping (Opaque/transparent) and color placement.
4 Practice compositions on printing paper cropped 1 1/2 inches from the top of the page.
Create 4 designm organizations using a rectangle to stand for your motif.
Think about how you place your motif in relationship to the other motifs.
Think about overlapping opaque and transparent shapes.
Begin your final design in pencil.
Organize shapes in the work in terms of warm and cool colors creating a strong center of interest. You should thnk about contrast of warm and cool and amount of warm and cool colors.
Start up
Name Design
Motif overlapping (Opaque/transparent) and color placement.
4 Practice compositions on printing paper cropped 1 1/2 inches from the top of the page.
Create 4 designm organizations using a rectangle to stand for your motif.
Think about how you place your motif in relationship to the other motifs.
Think about overlapping opaque and transparent shapes.
Begin your final design in pencil.
Organize shapes in the work in terms of warm and cool colors creating a strong center of interest. You should thnk about contrast of warm and cool and amount of warm and cool colors.
Interim 2nd qt.
All work due up to Name design.
Start up
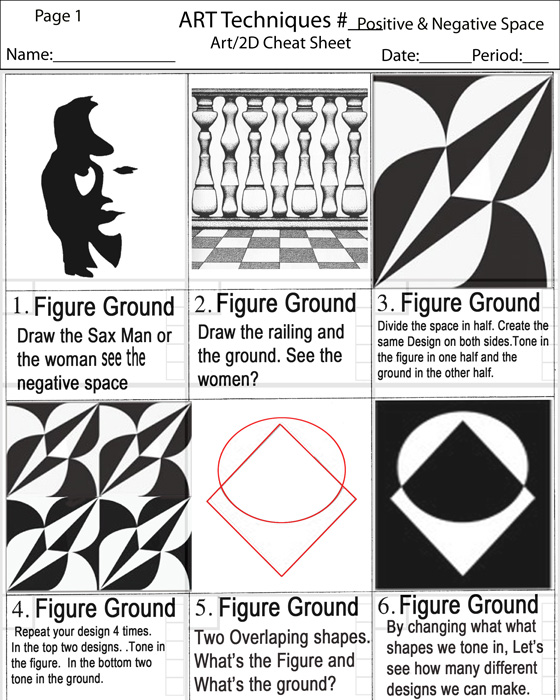
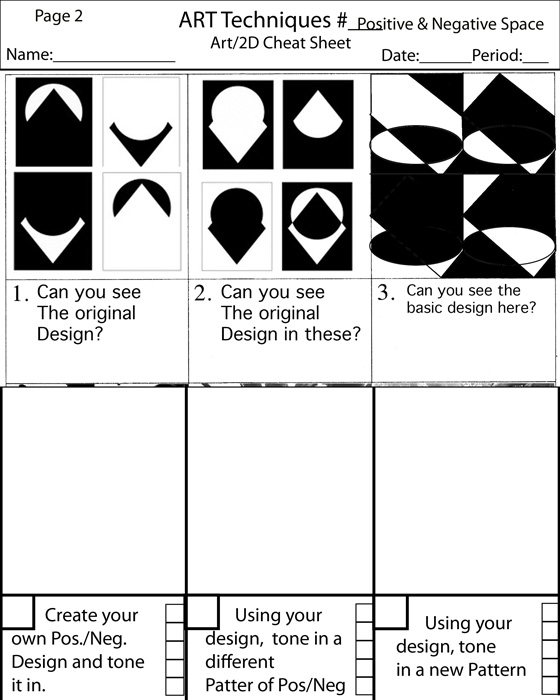
Art Techniques - Pos/Neg Space -
Pos/neg Design. 20 Boxes
Start up
Name Design
Motif overlapping (Opaque/transparent) and color placement.
4 Practice compositions on printing paper cropped 1 1/2 inches from the top of the page.
Create 4 designm organizations using a rectangle to stand for your motif.
Think about how you place your motif in relationship to the other motifs.
Think about overlapping opaque and transparent shapes.
Begin your final design in pencil.
Organize shapes in the work in terms of warm and cool colors creating a strong center of interest. You should thnk about contrast of warm and cool and amount of warm and cool colors.
Dec. 5
Dec. 6
Dec. 7
Dec. 8
Dec. 9
Start up
Name Design
Begin your final design in pencil.
Organize shapes in the work in terms of warm and cool colors creating a strong center of interest. You should thnk about contrast of warm and cool and amount of warm and cool colors.
Start up
Name Design
Begin your final design in pencil.
Organize shapes in the work in terms of warm and cool colors creating a strong center of interest. You should thnk about contrast of warm and cool and amount of warm and cool colors.
Organize shapes in the work in terms of warm and cool colors creating a strong center of interest. You should thnk about contrast of warm and cool and amount of warm and cool colors.
Start up
Name Design
Begin your final design in pencil.
Organize shapes in the work in terms of warm and cool colors creating a strong center of interest. You should thnk about contrast of warm and cool and amount of warm and cool colors.
Start up
Name Design
Begin your final design in pencil.
Organize shapes in the work in terms of warm and cool colors creating a strong center of interest. You should thnk about contrast of warm and cool and amount of warm and cool colors.
Dec. 12
Dec. 13
Dec. 14
Dec. 15
Dec. 16
Start up
Work on the Name Design
Organize shapes in the work in terms of warm and cool colors creating a strong center of interest. You should thnk about contrast of warm and cool and amount of warm and cool colors.
Start up
Work on the Name Design
Organize shapes in the work in terms of warm and cool colors creating a strong center of interest. You should thnk about contrast of warm and cool and amount of warm and cool colors.
Start up
Work on the Name Design
Organize shapes in the work in terms of warm and cool colors creating a strong center of interest. You should thnk about contrast of warm and cool and amount of warm and cool colors.
Start up
Work on the Name Design
Organize shapes in the work in terms of warm and cool colors creating a strong center of interest. You should thnk about contrast of warm and cool and amount of warm and cool colors.
Start up
Work on the Name Design
Organize shapes in the work in terms of warm and cool colors creating a strong center of interest. You should thnk about contrast of warm and cool and amount of warm and cool colors.
Organize shapes in the work in terms of warm and cool colors creating a strong center of interest. You should thnk about contrast of warm and cool and amount of warm and cool colors.
Organize shapes in the work in terms of warm and cool colors creating a strong center of interest. You should thnk about contrast of warm and cool and amount of warm and cool colors.
Organize shapes in the work in terms of warm and cool colors creating a strong center of interest. You should thnk about contrast of warm and cool and amount of warm and cool colors.